 |
 |
 |
PList Decoding | ||||||||||||||||||||||||||||||||||||||||||||||||||||||||||||||||||||||||||||||||||||||||||||||||||||||||||||||||
| Ian Whiffin Posted: 23rd October 2019 Revised: 17th November 2019 Tweet #share |
|||||||||||||||||||||||||||||||||||||||||||||||||||||||||||||||||||||||||||||||||||||||||||||||||||||||||||||||||
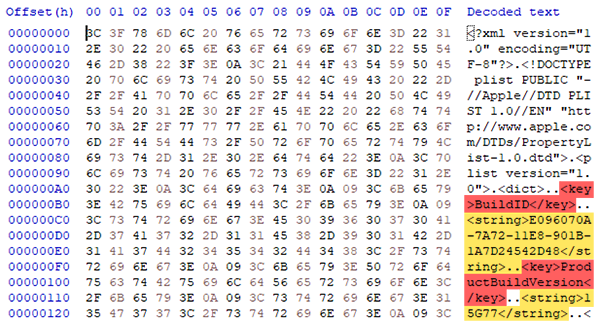
| While writing ArtEx, I decided I wanted to extract both the Device Name and the iOS Version from the extracted data. I thought this would be a really simple task that would look nice in the application. Little did I realise at the time exactly what would be required to pull out these simple bits of data. I opted to write my own DLL to parse the PLists, rather than rely on a third party plugin, and subsequently decided to make a standalone tool that made more use of it than ArtEx did, including sharing the DLL for anyone else who may benefit. "Mushy PList Viewer" was born and is available in the Software Section of this site. But first... What are PLists? PLists are a type of file used by Apple for storing data such as application or device settings. There are two different types of PLists; XML and Binary PLists. XML PLists are simple XML style documents where everything is listed consecutively in a Key/Value pair fashion.
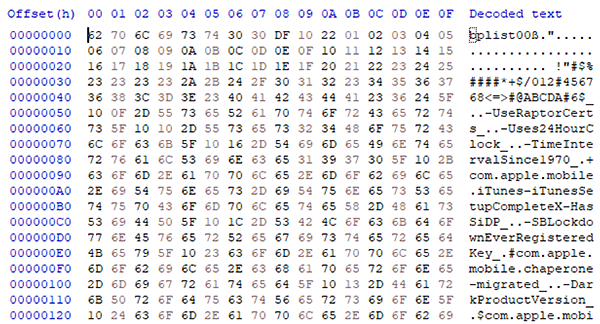
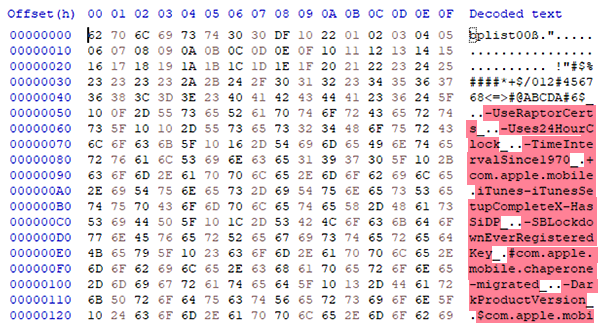
However, the Binary PLists are where things begin to get more complicated interesting. Taking a look at the first bytes of a BPLists we can see things are totally different: The file header "bplist" is a clear indicator you are looking at a binary PList.
And when we start to pick out the keys, we can see that all the keys are blocked together
This is because BPLists record data in a totally different, much more complicated way. Decoding Binary PLists Binary PLists split all of the data into various sections of the file..
The Header contains information about the type of file it is and the version of BPList.
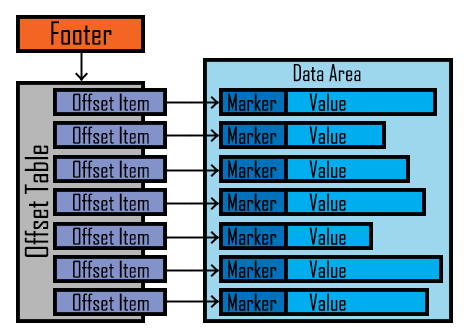
This image demonstrates how the Footer points to the Offset Table which contains Offset Items which in turn point to Marker items in the Data Area. The Offset Items start with a Marker which defines what type of data the value is and it's length and is immediately followed by the value itself. The Footer To start decoding Binary PLists, we need to start at the very bottom of the file, specifically, the last 32 bytes which make up the Footer (Starting with the red block in the image below)
The Footer defines where in the file we can find the Marker and Offset Tables, how many objects they contain and the size of the objects. The Footer breaks down as follows;
Once we have worked out of the Footer, we can move on to the Offset Table. The Offset Table The Offset Table is a list of pointers which defines the offset location of the Values within the Data area. Using the information from the Footer, we know that;
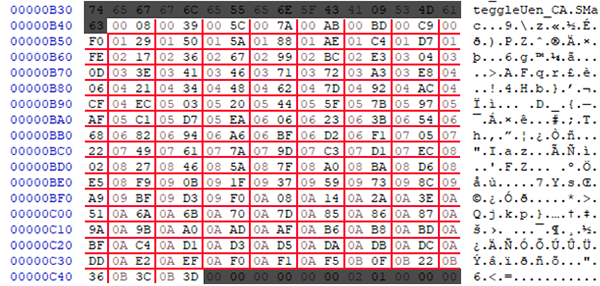
This image shows the entire 260 bytes of the offset table, divided into 130 sets of 2 bytes. Each of the Offset Items contains an Offset Location within the data area of the file. The very first item in the Offset Table is at position 0x0B41 and has the value 0x0008, so we would go to offset 0x0008 (relative to the start of the file) to find the value. Going back to the first item, we head offset 0x0008 to find out the marker for the first item.
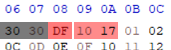
In this case, the marker starts 0xDF. But what does 0xDF mean? To work this out. we need to learn more about Data Types. Data Types There are several different Data Types used by BPLists, each can be a different size or is handled differently. A dictionary needs to be handled totally different from a Date for example. The marker byte will always identify the Data Type but not always the length. Sometimes, more bytes are required to work out the length. To work out a Marker, we split the marker byte into two nibbles, so DF becomes D and F. This information lets us know how to interpret the item.
So in our example case of 0xDF, we now know that the item is a Dictionary and finding out the number of items in the dictionary requires us to look at the next two bytes which if you recall are 10 and 17
You may recognize this data from the example above where we worked out that 0x1017 = 23. Therefore, we now know that the dictionary contains 23 objects. Although all BPlists have a dictionary at their root (meaning it is always the first thing that needs working out) understanding the layout of dictionaries is best saved until we've covered a few of the more basic data types. Once you are at the Marker byte, having started in the Offset Table and found the appropriate Offset Item: Integers/Reals (0x1?, 0x2?)) As mentioned earlier, Integers can be either 1,2,4, or 8 Bytes long depending on what the type of integer:
In one of out cases, we have:
The first byte (0x12) lets us know it is an integer and because 2 to the power of 2 is 4, we need to take the following 4 bytes as the value (0x5B 2A 80 EA). Dates (0x4?) Dates are saved as Double (8 Bytes) and are usually in Mac Absolute Time (seconds since Jan 1st 2001).
In this example, the Marker is 0x33 which we know to be a Date and we know there will ALWAYS be 8 bytes required. Strings (0x5?) Strings are saved as one byte = one character. So once you know the number of characters in a string, you know the number of bytes required.
In the example above, we know that 5 is a string and F means we need the next two bytes in order to calculate the size. The Marker is shown in dark blue whereas the value is shown in light blue. Unicode Strings (0x6?) Unicode strings are very similar to regular strings however they require 2 bytes for each character instead of one (this allows for special characters to be used outside of the standard ASCII set). For example, if you have the marker 0x6F1014, you know it is a Unicode string with 0x14 (decimal 20) characters. But because each character is 2 bytes, we need to take 40 bytes. Data (0x4?) Data is saved as a list of bytes. What you do with those bytes is up to you. Well, the software. For example, they may be an embedded Plist, an image or a key to something. Or literally anything else. Arrays (0xA?) Arrays are just lists of objects*. Arrays are handled in BPLists like mini BPLists embedded in the data. *An object could be any data type. So within a list there may be a string, an integer and even another list. Arrays are identified in the data the same way as all other object types; with a type marker (0xA) followed by the size of the array.
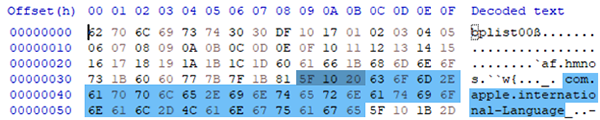
The above image shows the Marker highlighted in red. 0xAF 10 42 defines an Array (0xA) with 66 items (0x42). The 66 items are highlighted in orange. Notice that each of the 66 items are all consecutive?
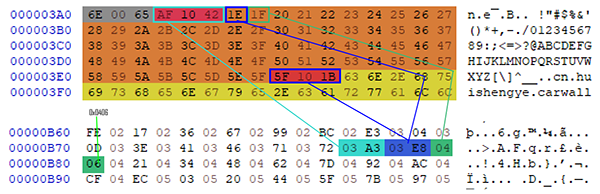
The above image shows how Offset object 29 (Cyan background) points to a Marker at offset 0x03A3 in the data table (Bordered in cyan) which then defines the Array (Red) and then lists all objects inside the array (Orange background). Dictionaries (0xD?) Dictionaries are basically the same as a list, except every item in the list is Key/Value pair. *A Key/Value pair is a pair of objects where one is the object (aka the Value) and one is the objects name (aka the Key). They are written in the BPList similarly to Arrays, where a list of pointers to the Offset Table are listed after the Dictionary's definition. The main difference is that because they are paired objects, each object in the Dictionary requires double the number of pointers (one for the Key and one for the Value). They are arranged with all Keys being consecutive, followed by all Values.
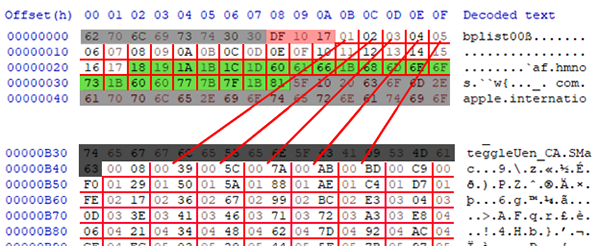
This image shows the dictionary definition in red, followed by 23 bytes (white) which make up the Keys and a further 23 bytes (green) which make up the Values. The bytes that make up both the Keys and Values are pointers back to he Offset Table. When the pointer has the value 0x01 it is pointing to Object 1 in the Offset Table (Don't forget that the Offset Table is zero indexed).
This image shows a line drawn between the Pointer object and the Offset Item it refers to. The Object in the Offset Table then points us to the offset of the data area. In the case of Offset Object 1, it has a value of 0x0039, so we must go to offset 0x39 to find the actual data. Offset item 2 has a value of 0x005C and so we go to offset 0x5C to find the actual data.
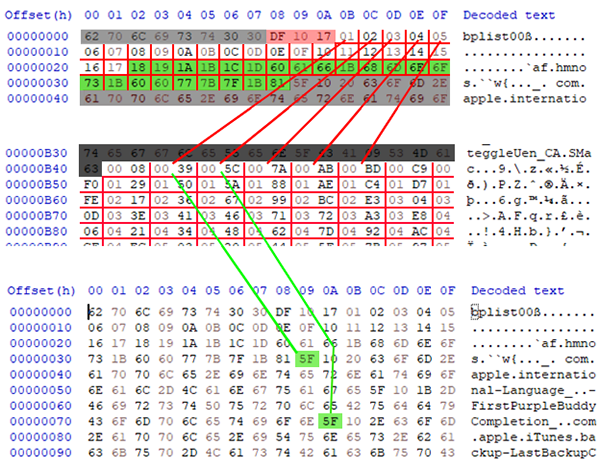
This image is split into 3 sections and shows the start of the file at the top and is repeated at the bottom. The file footer is shown in the middle. It demonstrates how the Objects in the Dictionary point to an Object in the Offset Table which in turn points back to and Offset in the Data area. In the first instance (Object at offset 0x0B) it's value is 0x01 so we head to the object at index 1 in the Offset Table. There we find the value 0x0039 which we follow back to offset 0x0039in the Data area and has a Marker of 0x5F. When we workout the entire value for that Marker, we get the string "com.apple.international-Language" which is the first Key in the dictionary. Once all Keys have been mapped, we then hit the Values, which are worked out in exactly the same way. Putting it all together
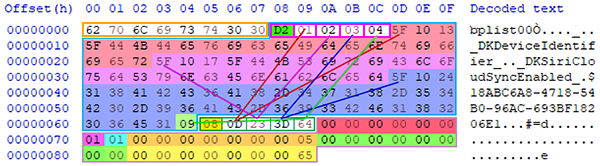
This image is a really small BPList file, but it is perfect for showing everything on a single image. Orange Outline = File Header The File Footer is separated into:
The first object in the Offset Table (Green Border/Yellow Background) points to 0x08 (Pink border/Green Background) with a value of 0xD2. We start by going to 0x09 which has a value of 0x01. This is referencing item 1 in the Offset Table and there is a RED line between the two bytes.
Item 1 of the offset table is 0x0D which is a reference to an offset in the data area of the file. So we go to offset 0x0D (follow the rest of the RED line) to find the value 0x5F. We then go to Key pointer number 2: 0x0A to find value 0x02 and follow the PURPLE line to the second Offset item, value 0x23. At offset 0x23 we find 0x5F which results in the string "_DKSiriCloudSync Enabled". At this stage, we have identified both Keys in the dictionary, but none of the values. Effectively, we have:
We then go to Value number one: 0x0B and follow the BLUE line to Offset item 3 which has a offset value of 0x3D to eventually get string value "18ABC6A8-4718-54B0-96AC-693BF18206E1" Finally, Value number two: 0x0C to follow the GREEN line to Offset item 4 for value 0x64 to get the Boolean value TRUE. Now we have identified the Values too, completing the file.
Wrapping Up The information above should be enough to help you manually break down a BPList (should you get the desire to) or to even write your own parser to do it for you. The complexity of the file may change but ultimately the way it is stored should remain consistent. Thank you for reading. Hopefully you've learned something useful and it will help you in the future. Don't forget, you can download my own FREE PList Parser "Mushy" from the Software section of my site which will soon include a DLL that can be incorporated into your own tools. |
|||||||||||||||||||||||||||||||||||||||||||||||||||||||||||||||||||||||||||||||||||||||||||||||||||||||||||||||||
|
|||||||||||||||||||||||||||||||||||||||||||||||||||||||||||||||||||||||||||||||||||||||||||||||||||||||||||||||||


| Search |
| Social |
| Tweets by BlakDouble |